So for my first project I made a smile in 'Processing' that took me about half an hour. Something that would have taken me about 30 seconds in Microsoft paint. To be honest, it was a good way to get an understanding of Bezier Curves, Pixel cordanates and get a gerneral feel for Processing.
To cut the proverbial ribbion I have decided to call my first upload "Hello World"
Thursday, 28 July 2011
Monday, 18 July 2011
The finished product
You can make one too! Here is how it was done:
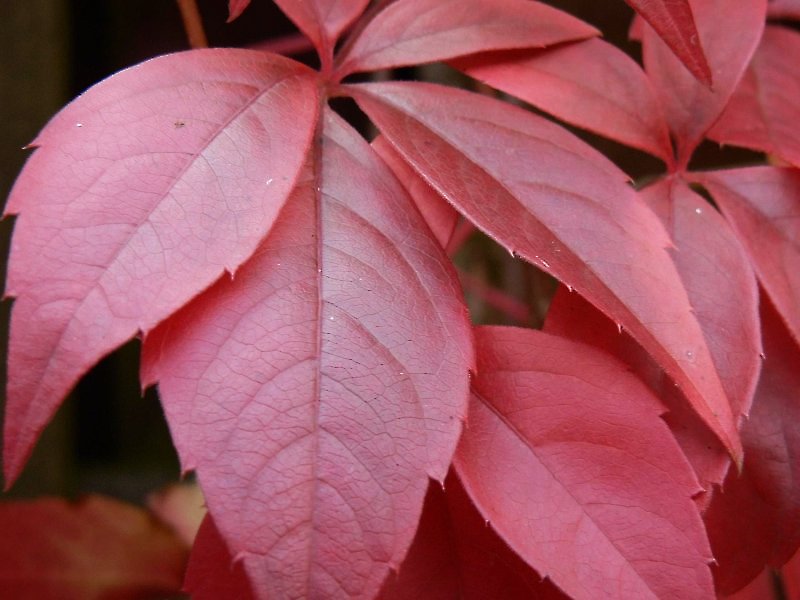
First you need a leaf template. This can be done by first drawing a four centimetre line. Then use something round, about two centimetres in diameter, to draw a half a circle with the middle matching up with the end of the original line. Last connect the ends of the semicircle by drawing straight lines from them to the begining of the first line.
Trace the shape of leaf template on board so you have 35 leaves and cut them out.
Ok, now the fun bit. To make the colours, experiment with different shades of each colour, in order to try and blend them into each other. I used watercolour paints. Then paint each leaf with a roller sponge and order them in such a way as to blend into each other. For example, I started with dark blue and went through different shades until a light greenish blue - light green - dark green - dark brown - light, yellowish brown - yellow - orange - red - dark red - dark pink - light pink - purple. This gave it the effect of evolving through the colour spectrum.

Then you have to begin the evolution of the shape of the leaf. Starting from the bottom, in groups of threes, take out one extra triangle at a time. So the first group of three is the original rounded leaf shape with no cuts, the next has one triangle cut out, the next two etc. until the leaves at the top have become the spiky, end-product leaf, like so.


Finally, you have to prepare them in order on some kind of hanging stem or cord. I had wanted to do so in a pattern, placing them at angles on the way up like a kind of spiral but I could not get them to stay in place on the cord that I had used. Hang it in some kind of stand.

The Almost Finished Product
I cut the changes in groups of three with those at the top (pink) being the end of the evolution with cuts all the way around so that they resemble an oak leaf, and those at the bottom (blue) being the beginning of the evolution with no cuts at all, resembling a basic leaf shape.

Creating Colours and Leaves


I cut out my leaves (without the changes) and mixed colours together to make a series of colours that blended into each other.
Thursday, 14 July 2011


Wednesday, 13 July 2011

Experimentation with Leaf Design

After some experimentation with leaf designs, I decided the best way to show a progression while maintaining the appearance of a leaf was to take out a triangle of the side at each point of progression. This picture was to work out how many triangles I would need to take out of each leaf and therefore how many progressions my project would require. I settled on 22 (11 on each side, as shown above). Each set of three leaves will project from the central wire at a rotation of 90º from the one below it and will be 1.2 cm further up the wire. They will also have some kind of colour progression as well.
Now I need to create a template for the leaves.


More Ideas
 |
| Spectral Zenith by Jen Stark |
I found this artwork by Jen Stark while doing some research into my idea of using leaves or petals as my changing shape. Her work is an amazing example of changing colour in a three dimensional space. Inspired by the beauty of it, decided to go with leaves rather than petals and to try and make three overlapping leaves at each point up the spiral. Each set of three leaves would be changed slightly at each point of the spiral.
Change of Direction
After experimenting a bit with my idea of a tornado effect, I realised that it would not sufficiently show a progressive pattern, as I had been approaching the project the wrong way. Back to the drawing board. I began to think of what could be similar to my tornado idea but show a progression of changes.
I thought of a fan propellor - with each propellor winding up a piece of flexible wire to create a kind of staircase effect and keeping the winding effect of my original tornado concept. Each propellor would have a small change, such as a colour change or a small kink taken out of each propellor to end up with a jagged effect by the last propellor. It would progress upwards.

After doing a rough drawing of this idea, it reminded me of a plant and I thought of making a plant with leaves or petals that progressively change and I decided to try and make a cube out of sticks and have the flexible wire with the leaves/petals suspended in the middle of the cube.

These are the sticks and materials to make the frame.
Finding Materials
I went looking for materials to start experimenting with my ideas and found it difficult to find something to use as the rings. I thought at first of shower rings but I couldn't find anything quite suitable. I found twine, glue, cellophane, card and a few other materials to get me started. I eventually found, at a sewing shop, a strong, flexible material, called boning, that I could make my rings out of, thus giving me flexibility in sizes and structures. I also got copper wire to strengthen this material into its circular shape.
Now time to experiment...
Tuesday, 12 July 2011
First Inspirations and Attempts
An examination of the nature of structure... When I first got the task, it seemed like there were a billion possibilities, so I decided to choose a starting point of approach - should I try experimenting with different materials? Should I base it on something in nature? Should I base it on a pattern and use that to create the structure? Since I had just moved here from Australia, I thought maybe I should make it something related to New Zealand so I at first considered something related to snow-topped mountains. I found it very difficult to conceptualise what I could do with that though so I started to think of other possibilities.
Something I saw made me think of a glass vase I used to have at home that was similar in concept to this one here.

The vase I had had a more rounded circumference (with many tiny sides) and many more lines leading from the lower circle to the upper one creating a tornado effect. I decided to attempt a kind of tornado as well.
My first idea was to create a similar effect using two rings and string as the lines that would be twisted from the lower to the upper ring. I decided to cover it with cellophane and to create a central object out of card or paper which would have geometric shapes cut out of it to create light patterns on the wall. This was partly inspired by lanterns I had made as a child.
On thinking about it some more, I came up with another possibility, which seemed kind of interesting as well. I thought I could follow the tornado effect even more by using more rings and of decreasing sizes and joining each one by strings, as in the first idea.
Subscribe to:
Comments (Atom)